If you’ve spent as much time as I have on the internet looking at art and watching art tutorials, you’ve probably seen negative or reverse painting with watercolors. I really liked the look of these paintings and knew I needed to give it a try. Because I wanted to use simple shapes, I kept thinking about playing cards……so, that’s what I decided to try.
Some of the links below are affiliate links. This means that, at no cost to you, I will earn an affiliate commission if you click through the link and finalize a purchase.
Supplies You'll Need
The supplies are pretty simple, this is everything you’ll need
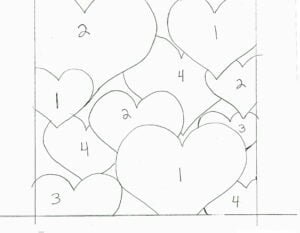
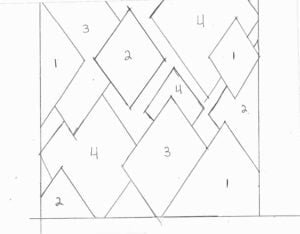
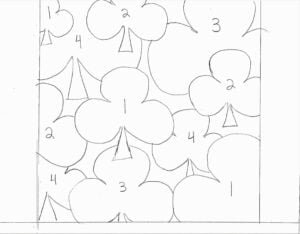
When you start thinking about how to lay out your shapes, keep in mind that in reverse painting, you’ll be working from foreground to background. I saw several videos where they were winging it and they turned out great, but I decided to sketch mine out on a separate piece of paper since this was my first time to do reverse painting and I haven’t used watercolors much at all. I felt more confident knowing how my finished layout was going to look, but, after doing this, I feel like I can wing it on my next one! Here are my sketches below.
If you would like to download these sketches for a reference guide click here.
Painting Layer By Layer
When I painted my first negative paintings of the playing card suit shapes I got a little side tracked while painting and forgot to take some of the pictures that I needed so I painted another one so that I could show the process.
Let’s start this one by covering the whole page with a very light wash of blue and green using lots of water. I took a paper towel and blotted the wet paint to take some of the paint back off. This is not a quick painting since you need to let your paper dry between each layer.
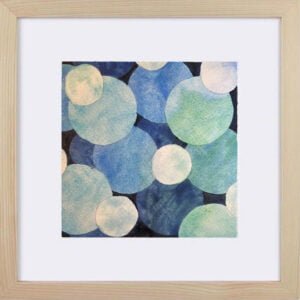
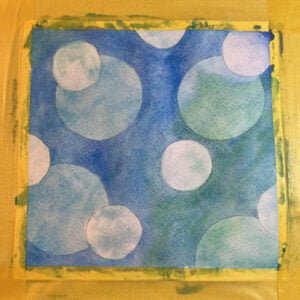
When your paper is dry, it’s time to trace some circles onto the paper. I traced a plastic cup for my first layer. The first layer is going to be the lightest shade and each layer should get a little darker. Be sure not to overlap any of these first circles. Trace your circles lightly so you can erase them later if you need to. Don’t try to erase anything on the wet paper.
My pencil marks didn’t show up in the pictures so the white circles were added later for reference.
Once you have your circles traced, cover all of the area on your paper around your circles. This is called negative painting because the circles are your “positive” space, so you paint everything else.
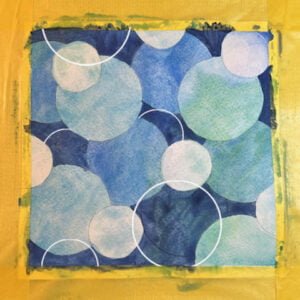
When that layer dries, it’s time to add more circles. (I almost forgot to take the picture again) I used larger circles by tracing the inside of a painter’s tape roll. This time have the circles overlap, some of the other circles without tracing in the first circle. (underlap may be a better term than overlap for this)
Repeat the steps again, trace circles, and paint the negative space. You’ll notice that with so much more overlap of circles, there becomes much less space to paint. As each layer gets darker, the painting begins to look like it has more depth.
By the time I got to this final layer I needed to add black to my paint to make it darker than the layer before.
It’s amazing how peeling the tape off and popping your painting in a frame can transform your art!
I found negative painting to be a really POSITIVE experience.